Spring MVC : Login App Part 2
Now let's try some validation for our dummy project. Use back the same project from the previous post. Remember the validation that we used for our Struts before? (Hope u do :P) Its somewhat same as this one.
First of all, get the spring-form.tld file from the spring.jar file. Extract it and you should be able to see that file residing inside the META-INF folder. Create a folder under WEB-INF in your project, name it as tld. Copy the tld file and paste it inside the tld folder. If you want to know more about the file, visit this. So your directory should be somewhat like below.
Let's update our web.xml file. Add the following code :
<taglib>
<taglib-uri>/spring</taglib-uri>
<taglib-location>/WEB-INF/tld/spring-form.tld</taglib-location>
</taglib>
Next we'll update our bean file and our controller and we'll also add a new file for vaildation. Let's start off with our LoginFormBean.java. This is our bean file, as you all know bean file consists of getters and setters. Since this is a login application, we'll add getters and setters for username and password. So create some functions as below :
public class LoginFormBean {
String name;
String password;
public String getName() {
return name;
}
public void setName(String name) {
this.name = name;
}
public String getPassword() {
return password;
}
public void setPassword(String password) {
this.password = password;
}
}
Now add these lines to LoginFormController.java under onSubmit function. System.out.println is optional :P
LoginFormBean loginBean = (LoginFormBean) command;
System.out.println("Username: " + loginBean.getName());
System.out.println("Password: " + loginBean.getPassword());
return new ModelAndView("success"); //success here is the success.jsp
Now for our validator file. Create LoginFormValidator.java under Validator package. Add this code. Make sure you implement Validator. (LoginFormValidator implements Validator)
LoginFormBean loginBean;
@Override
public boolean supports(Class clazz) {
return clazz.equals(LoginFormBean.class);
}
@Override
public void validate(Object commandObject, Errors errors) {
loginBean = (LoginFormBean) commandObject;
ValidationUtils.rejectIfEmptyOrWhitespace(errors, "name", "name", "Name is required.");
ValidationUtils.rejectIfEmptyOrWhitespace(errors, "password", "password", "Password is required.");
if (!errors.hasFieldErrors("name") && !errors.hasFieldErrors("password")) {
if ((loginBean.getPassword().equals("password") == false) && (loginBean.getName().equals("admin") == false)) {
errors.rejectValue("name", "name", "Incorrect Login Details!");
}
}
}
The validator class has 2 functions, supports() and validate() method. supports() is used to check whether the validator supports the class and validate() is used to validate the object of the supported class. rejectValue() takes in few arguments, in this example, it takes 3 arguments. First argument is for the bean property, second is the key value of the error message that exists in a resource file (here Ive ommited the resource file) so for this just keep it the same as the bean property, and third argument is the default error message in case the resource file is not found. (Resource file is the *.properties file)Next we're going to update our index.jsp page. Add this line right before the <html> tag. This is to use the tags from spring-form.tld.
<%@ taglib prefix="spring" uri="/spring" %>
The uri "spring" is the same as the one in <taglib> inside web.xml. Make sure the name is same :P
Start using the tags we have imported in the index.jsp. Its as follows :<spring:form method="post" action="" commandName="login">
<p>
User name :
<spring:input path="name"/>
</p>
<p>
Password :
<spring:password path="password" />
</p>
<p>
<spring:errors cssClass="error" path="*"/><br>
</p>
<p>
<p>
<spring:errors cssClass="error" path="*"/><br>
</p>
<p>
<input type="submit" name="Submit" value="Submit" />
</p>
</spring:form>
<style>
.error { color: red; }
</style>
cssClass="error" is referring to that css above. For path="*" , the * is a wildcard. Its referring to all the path (bean property) tag from the jsp . You can even specify one by one like this :
<spring:errors cssClass="error" path="name"/>
<spring:errors cssClass="error" path="password"/>
commandName="login" here is the same as the commandName specified in the dispatcher-servlet.xml.
Next we'll update our dispatcher-servlet.xml file. Since we have created a validator class, we'll make the validator being referred as well. Under the bean id = "loginForm" add the following line :
<property name="validator"><ref bean="loginValidator"/></property>
Create a new bean id for the loginValidator ref bean above.
<bean id="loginValidator" class="Validator.LoginFormValidator" />
Now try to run the application. You should be able to get the errors if its entered wrongly or submitting without entering anything.
13:48 | Labels: Code, Framework, Spring, Tutorial | 0 Comments
Spring MVC : Login App Part 1
Let's continue with Spring by trying out a new application - Login. We'll enhance this all the way. Adding on sessions and etc... for now, lets create a dummy login.
Create project as shown before. Don't forget to change the *.htm to *.do when creating a new project. Edit the dispatcher-servlet.xml to become .do. We use back the index.jsp as our login page. Create another jsp namely success.jsp in WEB-INF/jsp.
Add the following code to index.jsp. This is our login page.
<html>
<META http-equiv="Content-Type" content="text/html; charset=UTF-8">
<form id="form1" name="form1" method="post" action="">
<p>
User name :
<input type="text" name="name"/>
</p>
<p>
Password :
<input type="password" name="password" />
</p>
<p>
<input type="submit" name="Submit" value="Submit" />
</p>
</form>
</html>
Create 3 packages - Bean, Controller, Validator ( will be used in next tutorial). Under Bean package, create a java class - LoginFormBean.java. Leave it empty (empty class). Under Controller package, create a java class - LoginFormController.java. You can create this file by doing the following. Right click the project or from the file menu -> New File -> Spring Framework -> Simple Form Controller . The codes will be generated for you.

<bean id="loginForm" class="Controller.LoginFormController">
<property name="sessionForm"><value>true<value></property>
<property name="commandName"><value>login</value></property>
<property name="commandClass"><value>Bean.LoginFormBean</value></property>
<property name="formView"><value>index</value></property>
<property name="successView"><value>success</value></property>
</bean>
<bean id="urlMapping" class="org.springframework.web.servlet.handler.SimpleUrlHandlerMapping">
<property name="mappings">
<map>
<entry key="/index.do">
<ref bean="loginForm"/>
</entry>
</map>
</property>
</bean>
Remove the indexcontroller part. Notice that loginForm in the urlMapping bean is the same as the one above. Quoting from here.
- commandClass—the class of the object that will be used to represent the data in this form. (tht is the bean)
- commandName—the name of the command object. (bean name)
- sessionForm—if set to false, Spring uses a new bean instance (i.e. command object) per request, otherwise it will use the same bean instance for the duration of the session.
- validator—a class that implements Spring's Validator interface, used to validate data that is passed in from the form.
- formView—the JSP for the form, the user is sent here when the controller initially loads the form and when the form has been submitted with invalid data. (input)
- successView—the JSP that the user is routed to if the form submits with no validation errors. (success)
08:40 | Labels: Code, Framework, Spring, Tutorial | 0 Comments
Another basic Spring tutorial
After hours of figuring out how this Spring thingy works..finally came up with one simple app using controllers and stuff. So lets create an app to display values entered by user.
Jar files usually needed for Spring are :
- spring. jar
- standard.jar
- jstl.jar
- taglibs-string. jar
- commons-lang.jar
- commons-logging-1.1.jar
- spring-webmvc-2.5.jar
- log4j-1.2.14.jar
Create a new project, here I've used the name springtest. So far no jar files are needed except the one which comes together with the netbeans project file. While creating new project, change the *.htm to *.do coz we want to use it the .do way :P (refer below)
Create a jsp file under WEB-INF/jsp. Name it as test.jsp. (or any other name u like :P) Inside this test.jsp add the following code :
<html>
<head>
<meta equiv="Content-Type" content="text/html; charset=UTF-8">
<title>JSP Page</title>
</head>
<form method="POST" action="/springtest/dispatcher/saveform.do">
First Name:
<input name="firstName" type="text" value="">
Last Name:
<input name="lastName" type="text" value="">
<input type="submit" value="Save Changes">
</form>
</html>
springtest here is the project name. dispatcher here is the "dispatcher"-servlet.xml. if you give the name as name-servlet.xml then your action will look like this :: /springtest/name/saveform.do.
Now we're goin to edit dispatcher-servlet.xml.
change this "<prop key="/index.htm">indexController</prop>" to this "<prop key="/test.do">indexController</prop>" coz we're goin to connect it to test.jsp. well practically u can give it any name. Its just like the name of ur .do in struts :P So your code should look like this.
<property name="mappings">
<props>
<prop key="/index.do">indexController</prop>
</props>
</property>
</bean>
<bean name="indexController"
class="org.springframework.web.servlet.mvc.ParameterizableViewController"
p:viewName="index" />
So if you want to load any file, just replace the word index with the file name. In this case, change them to test. so it becomes test.do. In redirect.jsp, change the url to "test.do". Try running the project and see if it runs correctly. For some reason its not possible to run the specific file. It only works by running the whole project. This will be figured out soon as well..lol so patience!
So the final code :
<bean id="defaultHandlerMapping" class="org.springframework.web.servlet.handler.BeanNameUrlHandlerMapping"/>
<bean id="urlMapping" class="org.springframework.web.servlet.handler.SimpleUrlHandlerMapping">
<property name="mappings">
<props>
<prop key="/test.do">indexController</prop>
</props>
</property>
</bean>
<bean name="indexController"
class="org.springframework.web.servlet.mvc.ParameterizableViewController"
p:viewName="test" />
Create a success page. Name it as testsuccess.jsp for instance. Under this file, add the following code:
<%@ taglib uri='http://java.sun.com/jsp/jstl/core' prefix='c'%> //dont forget to add this at the top!
<html>
<head>
<meta http-equiv="Content-Type" content="text/html; charset=UTF-8">
<title>JSP Page</title>
</head>
<body>
<h2>Name <c:out value="${name}"/></h2>
</body>
</html>
c:out here is somewhat the same as our bean write in struts. Here the name is the attribute name that we have passed from controller. We will see that below.
Create a package under source packages. Name it as controller.
Under controller package, create java class called FormController.java. Inside this class, add the following codes :
package controller;
import javax.servlet.http.HttpServletRequest;
import javax.servlet.http.HttpServletResponse;
import org.springframework.web.servlet.ModelAndView;
import org.springframework.web.servlet.mvc.Controller;
public class FormController implements Controller {
public ModelAndView handleRequest(HttpServletRequest request, HttpServletResponse response) throws Exception {
return new ModelAndView("test");
//RequestDispatcher that will send the request to /WEB-INF/jsp/test.jsp
}
}
Create second file under the controller package called SaveController.java. Add the following code:
package controller;
import javax.servlet.http.HttpServletRequest;
import javax.servlet.http.HttpServletResponse;
import org.springframework.web.servlet.ModelAndView;
import org.springframework.web.servlet.mvc.Controller;
public class SaveController implements Controller {
public ModelAndView handleRequest(HttpServletRequest request, HttpServletResponse response) throws Exception {
String firstName = request.getParameter("firstName");
String lastName = request.getParameter("lastName");
return new ModelAndView("testsuccess", "name" , firstName + lastName);
//RequestDispatcher that will send the request to /WEB-INF/jsp/testsuccess.jsp
}
}
In this code, testsuccess is the jsp file. name is the attribute name which will be accessed by getParameter(), and firstName+lastName is the name that is sent thru that name attribute.
Then lastly add these last 2 lines inside the dispatcher-servlet.xml.
<bean name="/dispatcher/displayform.do" class="controller.FormController"/>
<bean name="/dispatcher/saveform.do" class="controller.SaveController"/>
these lines are similar to our struts-config.xml. bean name is the action name in struts. class is your java class (package.javaclassname)
Try running the whole application again. The output should be something like below :
09:40 | Labels: Code, Framework, Spring, Tutorial | 2 Comments
Random Tutorial: How to use mIRC to find what you need
SysReset is a script (fserve script) that allows users to run file servers using the Internet Relay Chat (IRC) technology.
Step-by-Step Sysreset Guide
- Go to SysReset
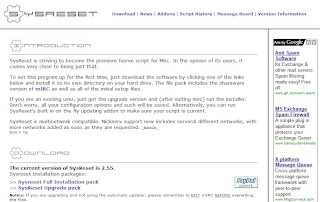
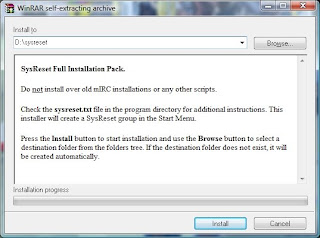
- Download "Sysreset Full Installation pack", current version is 2.55 & run the installer
- Open the folder
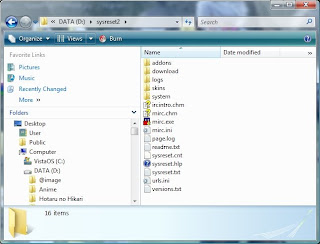
- Run mirc.exe
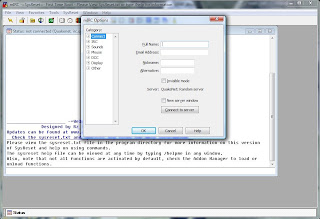
- Key in your Full Name (tipu2 pun ok gak), E-Mail, NickName & Alternative then go to Connect -> Servers (For this tutorial I will teach you how to download manga ^0^ from The Lurker). In order to connect to the channel you must find out 2 things, 1 is the Server, 2 is the Channel's name. For this tutorial, the Server = irc.irchighway.net, Channel's name = #lurk.
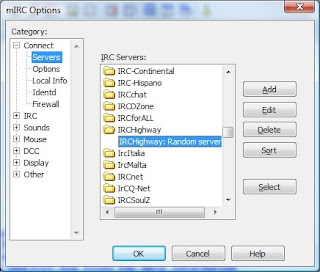
- Choose irchighway from the servers and double click on it.
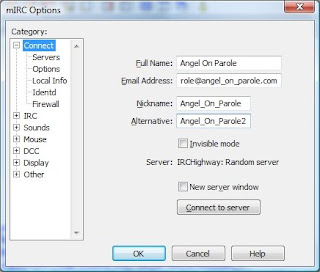
- Click OK
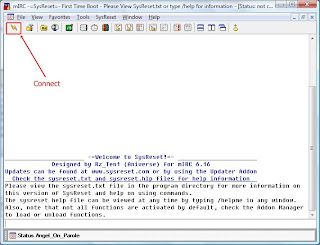
- Press The Connect Button & if you're using vista and it requires you to unblock, just unblock la. It's better if you u register your nickname :D coz some channels require that you're a registered user baru boleh masuk. Channels like #lurk
- Type in /ns register (a password) (your email address) in the command slot (Eg: /ns register yourpassword mail@mail.com) and Enter. After that check your email and follow the instructions.
- If you wanna learn more go to this site! They have some basic commands you can learn! :)
- Back to the main tutorial. Now we'll go to channel #lurk to download our manga! Click on favorites.
- Type in #lurk & join or if you wanna add the channel as fav, click on Add and press OK.
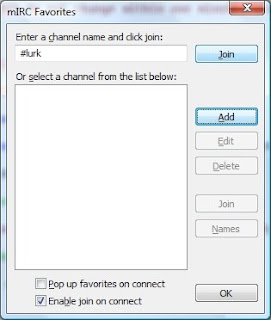
- Syabasss! Anda telah berjaya! weee!! But not yet there la... =p
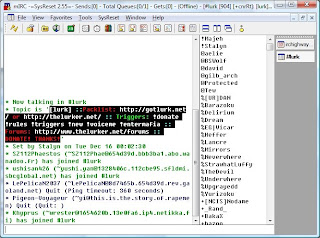
- Now I shall teach you the basic command on how to find & download the particular manga you seek. First go to lurk website -> Packlists -> Choose which Bot Name you prefer (Eg: Neverwhere) and choose which manga you want. I will choose pack #1 which is Host_Club_v10_c45[Puri-Puri_Neko].zip
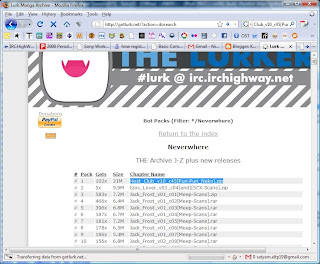
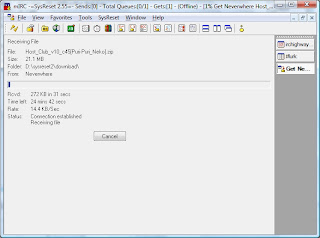
- Go back to SysReset and type /msg Neverwhere xdcc send #1 & wait for it to finish download :D
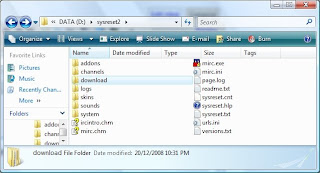
- After it finishes, go to your sysreset folder -> download to view your downloaded manga!!
Side Notes
- How to view manga/ img files without extracting the zip archive? Use CDisplay Comic Reader
- How to view all channel available in that particular server? Type /list in the command line
- Go back to the channel #lurk window and type in !list in the command. You will see something like this displaying.
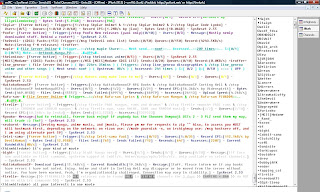
- Observe the list displayed and choose any Triger from a particular user. I will choose a Trigger from the user with the nickname bight - [bight- [Fserve Active] - Trigger:[/ctcp bight Manga here] - Users:[0/5] - Sends:[0/1] - Queues:[0/20] - Message:[FTP info now available on !list command, upstream capped at 2mbit/s. Anime/manga/mp3s/DVDs/etc. only available on select channels.] ]
- Write the trigger '/ctcp bight Manga here' and a new window will appear.
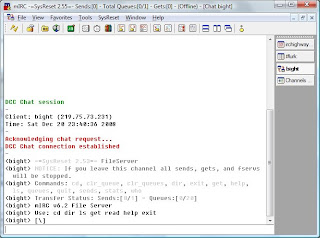
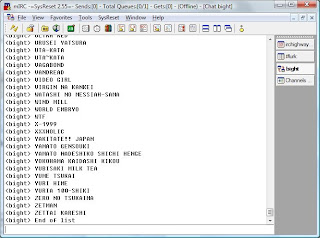
- You are now going to access the files serve by bight. Back to DOS Command! To view all the files available in his space, type in 'dir' & a list will appear.
- The list without any extensions is of folder type so you will need to open the folder first by typing 'cd [folder name]' (Eg: cd ZETTAI KARESHI) after that 'dir' to display all the files available in that folder.
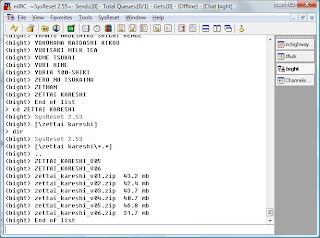
- To download the file just type 'get [file name.extension]' (Eg:get zettai_kareshi_v01.zip)
- Then don't forget to type 'exit' to finish your session :D Dun wan you to get banned or sumthing.
- As usual, wait for the file to finish then go to sysreset folder -> download and get your file.
15:17 | Labels: File Download, Mirc, Sysreset, Tutorial | 1 Comments
PHP Tutorial for beginner - Lesson 1 : Setting up Apache & MqSQL
XAMPP is an easy to install Apache distribution containing MySQL, PHP and Perl. XAMPP is really very easy to install and to use - just download, extract and start.
Step by Step Installation
- Choose XAMPP for Windows (Depending on ur OS that is) and download. As for me, I'll go for ZIP archive because with this you're not required to install anything.

- Download and extract the Zip archive to your drive C:/ or something and use it.
- Now it's time to run your server! Open your xampp folder and run setup_xampp.bat

- Next run xampp-control.exe

- Go to Modules and start your Apache & MySql. If windows require you to unblock anything, just unblock it! :D
- Now go to your web browser and type in "http://localhost/index.php".

- Choose your language & you will be directed to the main controller page

- You're basically DONE with installing Apache & MySQL =D
13:16 | Labels: Code, PHP, Tutorial | 2 Comments
Very Very Basic Tutorial On Spring
1. Create New Project. Select Web category and web application project. Click Next.
2. Give a project name. Select the location you wish to create the project. Click Next.
3. Select the desired server and java EE version. Click Next.
4. Check Spring Web MVC 2.5 and click Finish.
5. Open redirect.jsp page if it's not loaded. It shows a jsp tag that allows you to place the URL to the desired page. Right click the redirect.jsp and run the page.
6. This is what you'll see in the browser.
"Hello! This is the default welcome page for a Spring Web MVC project.
To display a different welcome page for this project, modify index.jsp , or
create your own welcome page then change the redirection in redirect.jsp to point to the new welcome page
and also update the welcome-file setting in web.xml. "
More tutorials will be published soon.. :P
Posted By - Lakshmi
11:01 | Labels: Code, Framework, Spring, Tutorial | 3 Comments
Congrats Ceti!

Btw... her CGPA is 3.98 @_@ this should encourage you-uns to put more effort in your studies :P
(Source : Utusan , Berita Harian )
Posted By - Lakshmi
11:16 | Labels: achievement | 5 Comments
Event @ Satyam : Halloween Contest (Most Haunted ODC)
10:08 | Labels: Contest, Events, Halloween | 1 Comments
Welcome.... Irashaimasu!
 Hi & welcome to the newly launched "Kooky Koding" blogspot. We hope you guys will be sharing all your recent & interesting finds here, be it programming, installer, even entertainment stuff or even your own creations. It's really a waste to see all those hard to google/search/learn programming codes, knowledge, interesting forwards go down the drain just like that... how bout posting them here, this way we can all learn something & maybe who knows, this blogspot might just be a time capsule for us in the future where we can dig out old stuff & reuse them...
16:44 | Labels: intro | 2 Comments


0 comments:
Post a Comment